Somewhere in your grow room right now, there is a mother plant you cannot afford to lose. Maybe she is a OG Kush pheno that took three packs to find, or a high-THC cut passed hand-to-hand for a decade. Traditional cloning keeps her alive — but only as long as she stays healthy, pest-free, and lit 18 hours a day. Cannabis tissue culture at home offers a radically different approach: shrink that irreplaceable genetics down to a few cells in a glass jar, store it on a shelf for months or years, and resurrect it whenever you are ready.
What once demanded a university lab now fits on a kitchen countertop. In this guide, we break down every step of DIY cannabis tissue culture — from explant preparation to acclimatization — so you can decide whether this technique deserves a place in your grow.
What Cannabis Tissue Culture Actually Is — And Why Home Growers Care
Cannabis tissue culture (TC) is the practice of growing plant cells, tissues, or organs on sterile nutrient media under controlled conditions. Instead of rooting a 6-inch cutting in rockwool, you place a microscopic piece of living tissue — the explant — onto agar gel fortified with mineral salts, sugars, and plant hormones, then watch it regenerate into a complete plant.
A 2021 review published in Frontiers in Plant Science by researchers at the University of Alberta and University of Guelph highlighted that in vitro propagation of cannabis is superior to conventional methods because it produces disease-free elite plants at a high multiplication rate. The same paper noted that a tissue culture lab can occupy roughly 10% of the footprint needed for a traditional mother room producing the same number of clones.
For home growers, the appeal falls into three categories:
- Genetic preservation — Store elite cuts in jars on a shelf instead of maintaining power-hungry mother plants year-round.
- Pathogen elimination — Meristem culture can strip viruses, viroids like hop latent viroid (HLVd), and systemic pathogens that traditional cloning simply passes along.
- Mass multiplication — A single nodal explant can yield 10 or more new plantlets per subculture cycle, scaling your favorite genetics rapidly.
Tissue culture is not a replacement for traditional cloning — it is a complementary tool. Use TC for long-term genetic storage and pathogen cleanup. Use traditional cuts when you need rooted clones fast.
Meristem Culture vs. Nodal Culture: Choosing Your Method
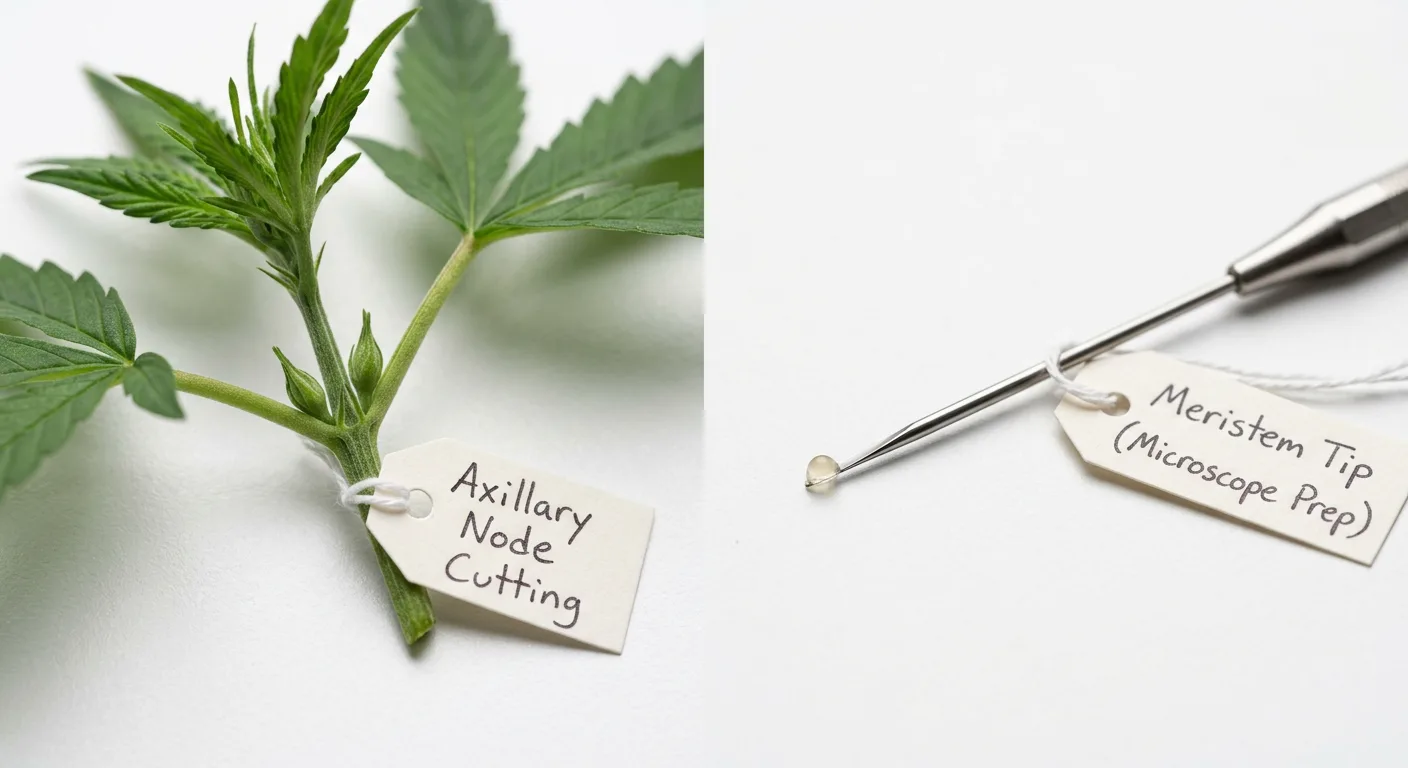
The two primary tissue culture cannabis cloning techniques for home use are meristem culture and nodal culture. Meristem culture excises only the tiny apical dome (0.1–0.5 mm) and is the gold standard for virus elimination. Nodal culture uses a larger stem section with an axillary bud (5–15 mm) and is significantly easier for beginners.
Meristem Culture Cannabis: The Pathogen-Free Option
The meristem is the undifferentiated growth tip at the very apex of a shoot. Because vascular tissue has not yet developed in this region, systemic pathogens — including viruses and viroids — cannot reach it. Excising just the meristematic dome (typically under 0.5 mm) produces what researchers call "virus-cleaned" stock.
Research from the University of Guelph's Gosling Research Institute for Plant Preservation, published in the journal Plants (Monthony et al., 2021), documented that meristem culture in cannabis remains challenging due to the extremely small explant size and the plant's recalcitrance to regeneration from minimal tissue. Success rates are genotype-dependent, and some cultivars respond far better than others.
Difficulty warning: True meristem culture requires magnification (a stereo microscope or high-quality loupe), steady hands, and practice. Expect a steep learning curve and initial failure rates of 50% or higher. Start with nodal culture to build sterile technique before attempting meristem excision.
Nodal Culture: The Practical Starting Point
Nodal culture uses a small stem segment containing one axillary bud. The bud already contains organized meristematic tissue, so it regenerates into a shoot far more readily than an isolated meristem dome. This is the method most DIY cannabis tissue culture kits are built around, and for good reason — it works reliably across most genotypes.
The tradeoff is clear: nodal culture preserves genetics and multiplies them efficiently, but it does not guarantee pathogen elimination the way meristem culture does. If your goal is HLVd cleanup, you need true meristem excision or a combination of thermotherapy and meristem culture.
Essential Equipment for DIY Cannabis Tissue Culture
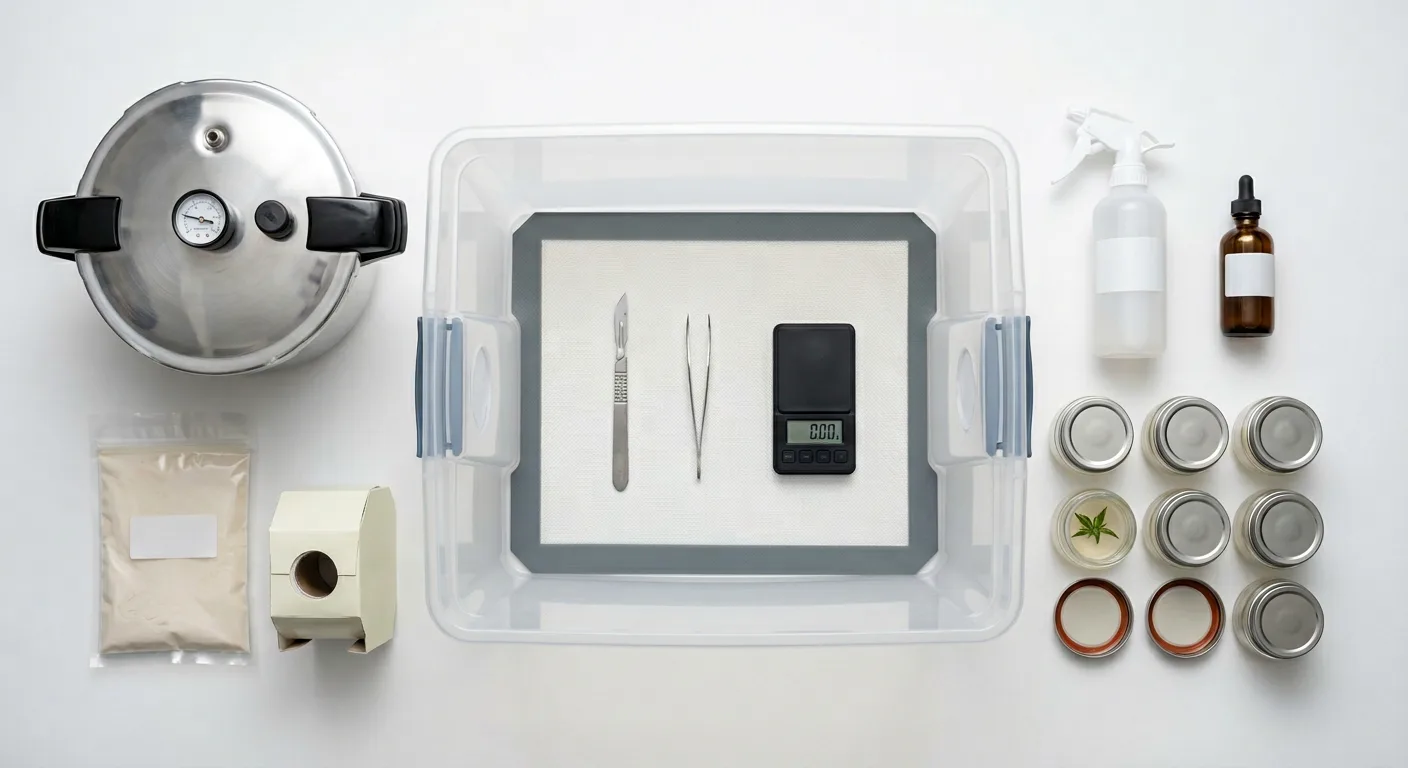
A functional home tissue culture setup requires sterile workspace, sterilization equipment, culture vessels, media ingredients, and cutting tools. The total investment for a beginner ranges from $150 to $400 — far less than most growers expect. Here is what you actually need.
Sterile Workspace: Laminar Flow Hood vs. Still-Air Box
A laminar flow hood (LFH) pushes HEPA-filtered air across your work surface, sweeping contaminants away from your cultures. It is the professional standard. A DIY version using a HEPA furnace fan and plywood enclosure costs $300–800 to build. Commercial units start around $1,500.
A still-air box (SAB) is a clear plastic storage tub with two arm holes cut in one side. You disinfect the interior with 70% isopropyl alcohol, let the air settle for 10 minutes, and work through the holes. Total cost: $15–30. The SAB trades higher contamination rates (expect 20–40% loss early on) for massive cost savings.
Practical recommendation: Start with a still-air box. If contamination remains above 30% after your technique matures over 3–4 sessions, invest in a DIY flow hood. Many experienced home TC practitioners use SABs exclusively with excellent results once their sterile technique is dialed in.
Sterilization: Pressure Cooker vs. Autoclave
An autoclave sterilizes media at 121°C and 15 PSI for 15–20 minutes. A standard kitchen pressure cooker does exactly the same thing at a fraction of the cost. Any pressure cooker rated to 15 PSI works. The Presto 23-quart model ($60–80) is the workhorse of the home TC community.
Culture Vessels
Glass baby food jars (4 oz) with modified lids are the most popular home option. Drill a small hole in each lid and cover with micropore surgical tape for gas exchange. Alternatively, use Magenta GA-7 boxes ($3–5 each) or any autoclavable glass jar with a polypropylene lid.
Tools and Consumables Checklist
- Scalpel handle (#3 or #4) with #10 or #11 blades
- Fine-point forceps (stainless steel, autoclavable)
- Alcohol lamp or butane micro-torch for flame sterilization
- 70% isopropyl alcohol spray bottle
- 10% sodium hypochlorite (bleach) solution for surface sterilization
- Parafilm for sealing culture vessels
- Nitrile gloves (non-powdered)
- Sterile distilled water
- Digital scale accurate to 0.01 g
- pH meter or pH test strips (range 5.0–7.0)
- Murashige and Skoog basal salt mixture
- Plant agar (8 g/L)
- Sucrose (table sugar works in a pinch)
- Plant growth regulators: TDZ, BAP, IBA, or NAA
- Plant Preservative Mixture (PPM) — optional but highly recommended
Best Agar Media for Cannabis Tissue Culture: Formulation Guide
The best agar media for cannabis tissue culture uses full-strength Murashige and Skoog (MS) salts as the mineral base, supplemented with sucrose as a carbon source, plant agar as the gelling agent, and specific plant growth regulators (PGRs) depending on the culture stage. pH must be adjusted to 5.7–5.8 before autoclaving.
Understanding MS Salts
Murashige and Skoog (MS) medium, developed in 1962, remains the most widely used basal salt formulation in plant tissue culture globally. It provides macro- and micronutrients, vitamins, and amino acids that support cell division and growth. Pre-mixed MS powder (with or without vitamins) is available from suppliers like PhytoTech Labs or Caisson Labs for $25–40 per bottle — enough for 50–100+ jars.
Stage-Specific Media Recipes
Cannabis tissue culture typically involves three media formulations across different growth stages. Research documented in Plants (Monthony et al., 2021) and Frontiers in Plant Science (2021) provides the following formulations used in successful cannabis micropropagation:
| Stage | Base Media | Sucrose | PGRs | Additives | Purpose |
|---|---|---|---|---|---|
| Establishment | Full MS (4.4 g/L) | 30 g/L (3%) | 0.5 μM TDZ | 0.075% PPM | Initial explant survival |
| Multiplication | Full MS (4.4 g/L) | 30 g/L (3%) | 0.5 μM TDZ or 1.0 μM BAP | 0.075% PPM | Shoot proliferation |
| Rooting | Half MS (2.2 g/L) | 20 g/L (2%) | 2.5–10 μM IBA | 0.2% activated charcoal | Root induction |
Science note: Thidiazuron (TDZ) is a synthetic cytokinin that has proven more effective than traditional BAP for cannabis shoot multiplication in multiple studies. However, TDZ at concentrations above 1.0 μM can cause hyperhydricity (vitrification) — waterlogged, translucent tissue that fails to develop normally. Start low at 0.5 μM and adjust based on your cultivar's response.
Preparing Media: Step-by-Step
Measure and Dissolve
Add 4.4 g MS salts and 30 g sucrose to 900 mL of distilled water. Stir until fully dissolved on a magnetic stir plate or by hand.
Add PGRs
Add your plant growth regulators from pre-made stock solutions. For multiplication media, add 0.5 μM TDZ. For rooting, add IBA instead.
Adjust pH
Use 1N NaOH or 1N HCl to bring pH to 5.7–5.8. This must be done before adding agar — pH affects gel firmness.
Add Agar and Top Off
Add 8 g plant agar, bring total volume to 1,000 mL with distilled water, and heat while stirring until agar dissolves. Do not boil vigorously.
Dispense and Sterilize
Pour 25–30 mL of warm media into each jar. Loosely cap with lids (do not fully tighten). Autoclave or pressure cook at 121°C / 15 PSI for 20 minutes. Allow jars to cool undisturbed on a clean surface.
Budget tip: Regular granulated sugar works as a sucrose source for home TC. Analytical-grade sucrose is unnecessary. Save your budget for quality MS salts and PGRs, which directly affect culture success.
Step-by-Step: How to Do Cannabis Tissue Culture at Home
The complete process of cannabis tissue culture at home involves four phases: explant selection and sterilization, establishment culture, multiplication through subculturing, and rooting. Each phase requires strict aseptic technique. Expect the full cycle from cutting to acclimatized plant to take 8–16 weeks.
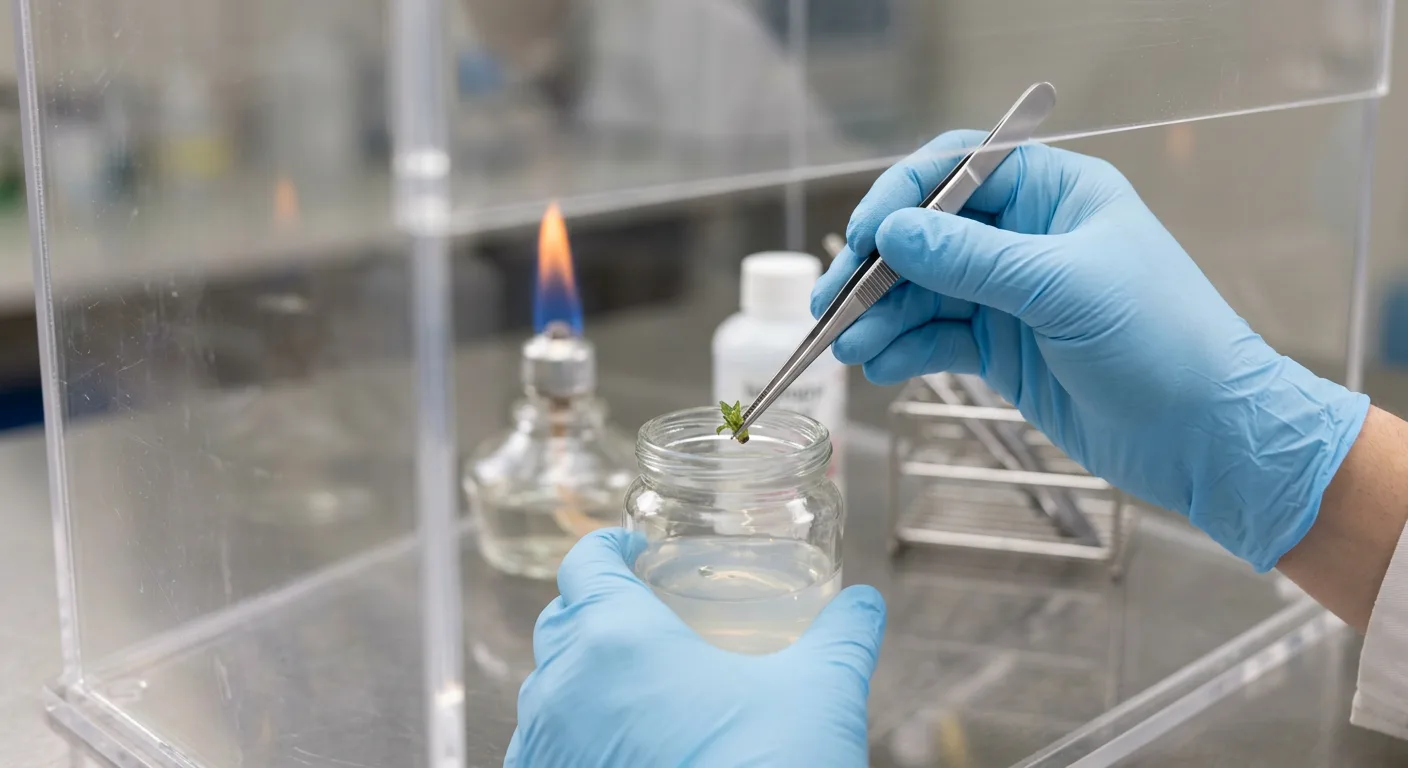
Phase 1: Explant Selection and Surface Sterilization
Select healthy, actively growing shoot tips from a vegetative mother plant. Avoid flowering tissue, stressed plants, or growth with visible pest damage. The ideal explant is a 2–3 cm shoot tip with 1–2 nodes, taken from new growth that is not yet woody.
Pre-Wash
Rinse cuttings under running tap water for 2–3 minutes to remove surface debris. A drop of mild dish soap helps remove hydrophobic residues from leaf surfaces.
Surface Sterilize
Submerge explants in 10% bleach solution (1 part household bleach to 9 parts water, add 1 drop of Tween-20 or dish soap as a surfactant) for 10–15 minutes. Gently agitate periodically.
Triple Rinse
Inside your SAB or flow hood, rinse the explants three times in sterile distilled water, using a fresh container each time. This removes residual bleach that would kill the tissue.
Trim and Plant
Using a flame-sterilized scalpel, trim the explant to a single node (5–10 mm for nodal culture) or excise the meristem dome under magnification. Place the explant upright on the agar surface in your prepared jar. Seal with parafilm.
Critical: Never let the bleach solution contact the cut ends of the explant — it will kill exposed internal cells. Sterilize the intact cutting first, then make your final trim cut inside the sterile workspace with sterile tools.
Phase 2: Establishment (Weeks 1–4)
Place sealed jars under cool white fluorescent or LED lights providing 40–60 μmol/m²/s (roughly 2,000–3,000 lux) with a 16/8 hour photoperiod. Temperature should remain at 24–26°C (75–79°F). Within 1–2 weeks, you will see one of three outcomes:
- Green growth and bud swelling — Success. The explant is alive and responding.
- Browning tissue with no growth — The explant has died, likely from over-sterilization or physical damage. Discard.
- Fuzzy or slimy growth on the agar — Contamination. Discard immediately to prevent spreading to other cultures.
Phase 3: Multiplication (Weeks 4–10)
Once the explant produces 2–3 new shoots (typically 3–6 weeks into establishment), it is time to subculture. Open the jar inside your SAB, excise individual shoots with a sterile scalpel, and transfer each to a fresh jar of multiplication media. Each subculture cycle can yield 3–10 new explants depending on cultivar vigor.
This is where tissue culture cannabis cloning truly outshines traditional methods. A single nodal explant can theoretically produce thousands of identical clones through repeated subculturing. Research documented by Monthony et al. (2021) noted a 100% response rate across all 10 cultivars tested during nodal micropropagation, though shoot proliferation rates varied significantly by genotype.
Phase 4: Rooting (Weeks 10–14)
Transfer well-developed shoots (2+ cm with at least 2 leaf pairs) to rooting media — half-strength MS with IBA and activated charcoal. Studies documented in Plants showed that formulations using MS + 0.2% activated charcoal + 10 μM IBA, or half MS + 2.5 μM IBA + 0.05% activated charcoal, successfully induced rooting, with approximately 69.9% of plantlets forming roots.
Keep rooting cultures at slightly lower light levels (30–40 μmol/m²/s) for the first week, then gradually increase. Roots should appear within 2–4 weeks.
Cannabis Tissue Culture Contamination Prevention
Contamination is the single biggest obstacle in home tissue culture. Fungal and bacterial contaminants grow faster than your explants on nutrient-rich agar, and a single airborne spore can destroy weeks of work. Prevention centers on three pillars: workspace sterility, explant sterilization, and ongoing vigilance.
Common Contaminants and How to Identify Them
- Fungi (mold) — Fuzzy, filamentous growth, usually white, gray, green, or black. Appears within 3–7 days of introduction. Often airborne spores from Aspergillus, Penicillium, or Trichoderma.
- Bacteria — Slimy, opaque, or cloudy growth on the agar surface or around the explant base. Often appears within 2–5 days. Color ranges from white to yellow to orange.
- Yeast — Small, shiny, dome-shaped colonies. Less common but persistent once introduced.
- Endogenous contamination — Bacteria living inside the plant tissue itself. These emerge from the explant after planting, despite perfect surface sterilization. This is the hardest type to prevent and the primary reason PPM (Plant Preservative Mixture) is so valuable.
Prevention Strategies That Actually Work
- Add PPM to your media at 0.075% (0.75 mL/L). PPM is a broad-spectrum biocide that suppresses both fungal and bacterial contaminants without harming plant tissue. It is the single most impactful additive for home TC success.
- Pre-treat mother plants — Move the mother plant indoors to a clean space 5–7 days before taking explants. Avoid overhead watering. Spray with a mild fungicide. Cleaner source material means fewer contaminants to fight.
- Flame-sterilize tools between every cut — Dip scalpel and forceps in 95% ethanol and pass through a flame until red. Let cool for 5 seconds before touching tissue.
- Work quickly and deliberately — Every second a jar is open, contaminants drift in. Practice your movements before working with actual cultures.
- Quarantine new cultures — Keep newly planted jars separate from established cultures for 7–10 days. This prevents one contaminated jar from spreading to your collection.
Expect 20–40% contamination losses when starting out with a still-air box. As your technique improves, this should drop to under 10%. If contamination stays above 30% after five sessions, systematically troubleshoot: is it the workspace, the sterilization protocol, or the source material?
Acclimatization: Bringing TC Plants Back to the Real World
Acclimatization (also called "hardening off" or "weaning") is the critical transition from sterile, high-humidity jar conditions to your normal grow environment. Tissue culture plantlets have thin cuticles, poorly developed stomata, and roots accustomed to agar — they will die within hours if moved directly into a grow tent.
The Weaning Process
Remove and Rinse
Gently remove the rooted plantlet from agar using blunt forceps. Rinse all agar residue from roots under lukewarm water. Any remaining agar will become a contamination magnet in soil or growing media.
Plant in Sterile Substrate
Use pre-moistened, sterile perlite, vermiculite, or a perlite-peat mix (1:1). Avoid hot soil mixes with heavy nutrient loads — TC plants are delicate and burn easily. If you grow in coco coir, a light buffered coco-perlite blend also works well.
Humidity Dome at 90–95% RH
Place plantlets under a clear humidity dome. Maintain 90–95% relative humidity for the first 5–7 days. Use a seedling heat mat if ambient temps drop below 22°C. Light should be gentle — 100–150 μmol/m²/s maximum.
Gradually Reduce Humidity
Over the next 10–14 days, progressively vent the humidity dome. Start by cracking it slightly for a few hours per day, increasing the duration and opening each day. Target 60–70% RH by the end of week 2. Use our VPD calculator to dial in ideal vapor pressure deficit as plants mature.
Transition to Veg Conditions
Once plants hold turgor without wilting in ambient humidity (typically 50–65% RH), they are ready for normal vegetative conditions. Increase light to standard veg intensity and begin light feeding at quarter-strength.
Acclimatization takes 2–3 weeks and is where many home growers lose otherwise healthy TC plants. Patience is non-negotiable. Rushing this step results in dessicated, dead plantlets.
Pro tip: Mist acclimatizing plantlets with a very dilute seaweed extract solution (quarter-strength). The natural cytokinins and auxins support root establishment and reduce transplant shock. Also consider inoculating with mycorrhizal fungi at this stage for stronger root development.
Tissue Culture vs. Traditional Cloning vs. Cryopreservation
Home growers now have three main options for preserving cannabis genetics: traditional cloning from cuttings, tissue culture, and emerging cryopreservation techniques. Each method occupies a different niche in terms of cost, complexity, and preservation duration. Here is an honest comparison.
| Factor | Traditional Cloning | Tissue Culture | Cryopreservation |
|---|---|---|---|
| Setup cost | $20–50 | $150–400 | $500–2,000+ |
| Ongoing cost | Electricity, nutrients, space | $0.50–1.00 per jar per cycle | Liquid nitrogen refills |
| Space required | Full mother room | Shelf or cabinet | Dewar flask (small) |
| Preservation duration | Indefinite (plant must live) | 6–24 months between subcultures | Theoretically indefinite |
| Pathogen elimination | No — passes all pathogens | Yes (meristem culture) | No (preserves pathogens too) |
| Genetic stability | Excellent | Very good (watch for somaclonal variation) | Excellent |
| Skill requirement | Beginner | Intermediate to advanced | Advanced to expert |
| Time to rooted clone | 10–21 days | 8–16 weeks | Months (recovery + acclimatization) |
| Home feasibility | Fully feasible | Feasible with dedication | Extremely difficult at home |
Why Tissue Culture Wins for Long-Term Storage
Traditional cloning demands a live mother plant consuming light, water, nutrients, and space 365 days a year. That is viable for 2–3 genetics. It becomes unsustainable for a collector with 10–20 elite lines. Tissue culture lets you store those 20 genetics on a single shelf, subculturing every 6–12 months — a few hours of work to preserve an entire library.
If you have invested in premium genetics — say an exceptional Northern Lights x Amnesia Haze phenotype pulling 24% THC, or a unicorn Purple Kush cut at 27% — tissue culture is the insurance policy that keeps those genetics safe without running a perpetual grow.
Where Cryopreservation Fits
Cryopreservation — storing tissue in liquid nitrogen at −196°C — is the ultimate long-term solution. Research from the Gosling Research Institute at the University of Guelph has explored encapsulation-based cryopreservation of cannabis, with Monthony et al. (2021) reporting 100% conversion from encapsulated explants after 90 days. However, this technique requires specialized equipment (cryogenic dewars, cryoprotectant solutions, programmable freezers) that remains impractical for most home setups in 2026.
For now, tissue culture is the sweet spot between traditional cloning's simplicity and cryopreservation's permanence.
Plant Tissue Culture Cannabis Preservation: Maintaining Your Library
Once you have established clean tissue cultures of your favorite genetics, maintaining them requires regular subculturing — transferring a small piece of each culture to fresh media before the old media dries out or nutrients deplete. For cannabis, this typically happens every 6–12 weeks depending on growth rate and storage temperature.
Slow-Growth Storage
You can extend the interval between subcultures by reducing temperature and light. Store cultures at 18–20°C (64–68°F) under dim light (10–20 μmol/m²/s) with a 12/12 photoperiod. Some growers reduce sucrose to 2% and add osmotic agents to further slow growth. Under these conditions, many cultivars can be maintained for 6–9 months without subculturing.
Record Keeping
Label every jar with cultivar name, date of subculture, media type, and subculture generation number. Track contamination rates per batch. This data becomes invaluable for optimizing your protocols. A simple spreadsheet or notebook is sufficient.
Genetic preservation through tissue culture pairs perfectly with a broader seed collection strategy. While TC preserves specific phenotypes as living clones, long-term seed storage preserves genetic diversity at the seed level. Together, they give you complete control over your genetic library.
Think of tissue culture as preserving the individual (one exact phenotype) and seeds as preserving the population (genetic potential from a cross). Serious breeders use both strategies.
Honest Cost and Complexity Assessment for 2026
Cannabis tissue culture at home is accessible, but it is not easy. Here is a transparent breakdown of what to expect in terms of money, time, and learning curve before you commit.
Startup Costs
- Still-air box: $15–30 (plastic tub + hole saw)
- Pressure cooker (23 qt): $60–80
- Glass jars (24-pack): $15–25
- MS salts (1 L prep): $15–25
- Plant agar (100 g): $10–15
- PGRs (TDZ, IBA): $20–40 for stock solutions
- PPM (100 mL): $20–30
- Scalpels, forceps, parafilm: $15–25
- pH supplies and sterilization chemicals: $15–20
Total estimated startup: $185–290 with a still-air box. Add $300–800 for a DIY laminar flow hood, or $1,500+ for a commercial unit.
Ongoing Costs
Consumable cost per jar averages $0.50–1.00 including media, agar, PGRs, and PPM. Maintaining 20 genetics with 2 jars each (40 jars total) costs roughly $20–40 per subculture cycle. If you subculture every 8 weeks, annual consumable cost runs approximately $130–260 — far less than electricity for a dedicated mother room.
Time Investment
- Learning curve: Expect 2–4 practice rounds (4–8 weeks each) before achieving consistent results.
- Media preparation: 1–2 hours per batch (makes 20–40 jars).
- Subculturing session: 2–4 hours per 20–40 jars, once every 6–12 weeks.
- Daily maintenance: Near zero. Check jars for contamination every 2–3 days.
Who Should — and Should Not — Try This
Good candidates: Growers with 5+ elite cuts they want to preserve long-term, breeders maintaining large genetic libraries, anyone dealing with pathogen issues (HLVd, viruses), and detail-oriented hobbyists who enjoy precision work.
Not ideal for: Growers who need clones fast (traditional cloning is 3–5x quicker), absolute beginners who have not mastered basic cultivation, or anyone unwilling to tolerate a learning curve with initial failures. If you are just starting out, focus on seedling care fundamentals first.
For growers looking to protect premium seed investments — a standout Sour Diesel pheno at 24% THC or a rare Quantum Kush expression reaching 30% THC — tissue culture offers genuine insurance. Pair it with our germination guarantee and you have covered both the seed and the phenotype.
Connecting Tissue Culture to Your Broader Grow Strategy
Tissue culture does not exist in isolation. It plugs into your overall cultivation workflow as a genetic management tool. Here is how it connects to techniques and systems you may already be using.
Hydroponic Integration
TC plantlets transition exceptionally well into hydroponic systems because their roots are already accustomed to sterile, soilless conditions. After acclimatization, moving TC clones into an ebb and flow system or any other hydroponic setup is often smoother than transplanting soil-rooted cuttings. The disease-free advantage of TC also reduces the risk of introducing root rot pathogens into sterile hydro reservoirs.
Breeding Applications
Advanced growers running breeding projects benefit enormously from TC. You can preserve both parent lines and exceptional F1 phenotypes while conducting multi-year selection work. Research published in Plant Methods (2024) demonstrated that cannabis can even be flowered and pollinated in vitro, producing viable seeds — a technique called "microflowering" that could dramatically accelerate breeding timelines.
Pair your tissue culture work with environmental optimization. Use our grow planner and nutrient calculator to dial in conditions for your TC-derived clones, and track your results with the yield estimator to quantify whether the extra effort pays off in harvest quality.
Frequently Asked Questions About Cannabis Tissue Culture at Home
How long does cannabis tissue culture take from explant to rooted plant?
The full process typically takes 8–16 weeks. Establishment takes 2–4 weeks, multiplication another 4–6 weeks, rooting 2–4 weeks, and acclimatization adds 2–3 weeks. This is slower than traditional cloning (10–21 days to rooted clone) but produces pathogen-free plants and enables long-term storage of genetics in minimal space.
Can I do cannabis tissue culture without a laminar flow hood?
Yes. Most home growers use a still-air box (SAB) — a clear plastic storage bin with arm holes — which costs $15–30. While a laminar flow hood offers better sterility, a properly used SAB with thorough disinfection and careful technique can achieve 60–80% contamination-free rates. Adding PPM (Plant Preservative Mixture) to your media further improves success.
What is the best agar media recipe for cannabis tissue culture?
The most effective base is full-strength Murashige and Skoog (MS) salts at 4.4 g/L with 30 g/L sucrose, 8 g/L plant agar, and pH adjusted to 5.7–5.8. For multiplication, add 0.5 μM thidiazuron (TDZ) and 0.075% PPM. For rooting, switch to half-strength MS with 2.5–10 μM IBA and 0.2% activated charcoal. These formulations are supported by research from the University of Guelph and University of Alberta published in peer-reviewed journals.
Does tissue culture produce genetically identical clones?
Yes — when done via organogenesis (nodal or meristem culture). However, prolonged subculturing or callus-mediated regeneration can introduce somaclonal variation. Research from the Gosling Research Institute for Plant Preservation recommends monitoring genetic fidelity through regular phenotype assessment and limiting subculture cycles to reduce mutation risk.
How much does a home cannabis tissue culture setup cost?
A basic setup runs $150–400 including a still-air box, pressure cooker, jars, MS salts, agar, PGRs, and tools. Ongoing media costs average $0.50–1.00 per jar. Maintaining 20 genetics costs approximately $130–260 per year in consumables — significantly less than the electricity for a dedicated mother room running 18 hours of light daily.
Sources & References
This article was researched and fact-checked using 5 verified sources including 3 peer-reviewed studies, 1 industry source, 1 community resource.
- The Past, Present and Future of Cannabis sativa Tissue Culture - PMC — pmc.ncbi.nlm.nih.gov [Research]
- Frontiers | Medical Cannabis and Industrial Hemp Tissue Culture: Present Status and Future Potential — frontiersin.org [Research]
- Optimizing cannabis cultivation: an efficient in vitro system for flowering induction | Plant Methods | Springer Nature Link — link.springer.com [Research]
- Cannabis Tissue Culture: Grow Plants in a Test Tube | Grow Weed Easy — growweedeasy.com [Industry]
- Complete Guide to Cannabis Tissue Culture 101 - Cannabis Tech — cannabistech.com [Community]