Most edibles tutorials skip the part that actually matters: knowing your starting material. If you grew your own flower, you have something dispensary buyers never have — a confirmed THC percentage and a strain profile you chose yourself. That changes everything about how to make cannabutter, from the gram-per-cup ratio you use to the effect character you can dial in. This guide covers the full process from flower to finished butter, including the potency formula that works specifically for home growers who know their numbers.
Step 1: Why Decarboxylation Is Non-Negotiable
Decarboxylation is the chemical process that turns inactive THCA into psychoactive THC. Without it, you will produce butter that smells like cannabis and does almost nothing. Every milligram of potency in your final edible depends entirely on getting this step right.
The THCA → THC Conversion: What's Actually Happening
Raw cannabis flower contains THCA — tetrahydrocannabinolic acid. THCA is not intoxicating. Heat removes a carboxyl group (CO₂) from the molecule and converts it into THC, the compound that binds CB1 receptors and produces psychoactive effects. This reaction is called decarboxylation, and it requires both the right temperature and enough time.
The conversion curve looks like this:
| Temperature | Time Required | Conversion Rate | Risk |
|---|---|---|---|
| 200°F (93°C) | 90 minutes | ~60–70% | Under-conversion |
| 220°F (104°C) | 60 minutes | ~80–85% | Slight under-conversion |
| 240°F (115°C) | 40 minutes | ~95–97% | Optimal sweet spot |
| 260°F (127°C) | 30 minutes | ~85% | Terpene and THC degradation begins |
| 300°F+ (149°C+) | Any | Declining | THC converts to CBN — weaker, sedating |
240°F for 40 minutes is the research-backed sweet spot for decarboxylation. Oven thermometers often read 15–25°F off from the actual temperature — always use a secondary probe thermometer to verify your oven's real heat output before you start.
How Long to Decarb Weed for Butter
The standard answer is 40 minutes at 240°F, but two variables change that: moisture content and grind size. Freshly dried flower with higher residual moisture needs closer to 50 minutes. Finely ground material decarbs faster than whole nugs — 35 minutes is often enough. A course, rough break-up with no grinding is the most consistent approach for even heat penetration across the whole tray.
- Preheat oven to exactly 240°F — verify with a probe thermometer
- Break cannabis into small pieces, do not grind to powder
- Spread in a single layer on parchment-lined baking sheet
- Cover loosely with a second sheet of parchment to reduce smell
- Bake 40 minutes — material should turn from green to light brown
- Remove and let cool completely before handling
If your cannabis turns dark brown or smells burnt, your oven ran too hot. THC has already begun degrading into CBN, which produces heavy sedation rather than a full-spectrum high. Calibrate your oven before your next batch.
The Mason Jar Oven Method (Smell Reduction)
If you want to make weed butter without smell, the sealed mason jar method is the most effective low-tech solution. Place broken-up cannabis inside a sealed mason jar and set it upright in the oven at 240°F for 40 minutes. The CO₂ released during decarboxylation builds minor pressure but stays safely contained at this temperature. Smell is dramatically reduced compared to an open baking tray.
After decarbing, let the sealed jar cool for 15 minutes before opening — the escaping CO₂ and terpene vapor will release slowly rather than all at once. This method also works well for infusion (covered in Step 3).
Step 2: Choosing the Right Strain for Cannabutter
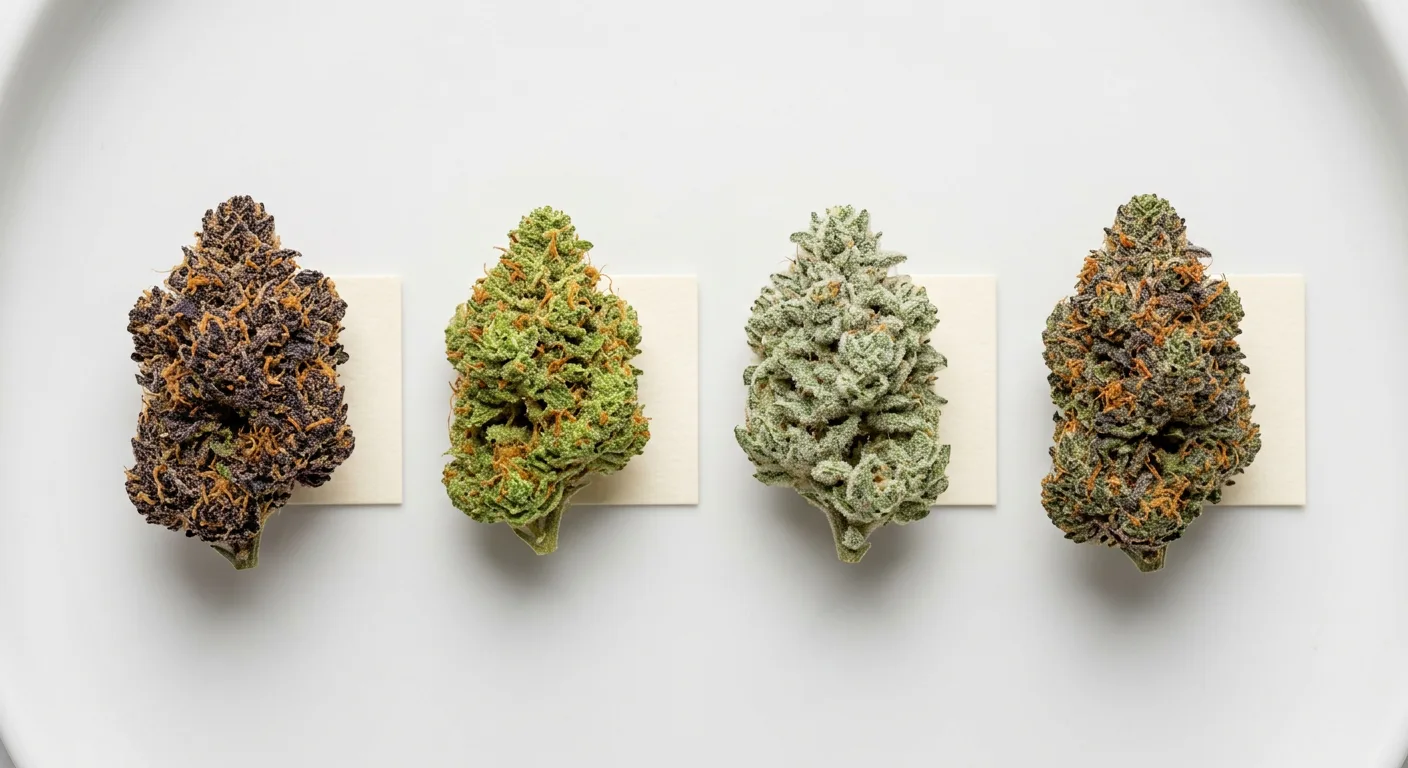
Strain selection determines three things about your finished butter: maximum potency ceiling, effect character (energizing vs. sedating), and terpene complexity. High-THC strains give you the most dose flexibility. Terpene-rich strains add nuance that makes the eating experience noticeably different from plain distillate edibles.
THC% and What It Means for Butter Strength
The THC percentage of your input flower is the single biggest lever you control. At the same gram-per-cup ratio, a 26% THC strain produces roughly 2.6 times more THC per serving than a 10% strain. This matters enormously when you are cooking for people with different tolerance levels.
- Budget/mild batches: 15–18% THC strains give good results at higher gram ratios without burning through premium flower
- Standard batches: 20–25% THC strains hit the sweet spot for predictable, measurable dosing
- Maximum potency: 25–30% THC strains require fewer grams per cup, which means less plant material flavor in your food
Terpene Profile and Effect Character
Terpenes do not disappear entirely during butter infusion — some survive the low-heat infusion process and contribute to the entourage effect of your edibles. Myrcene-dominant strains tend toward sedating, body-heavy effects. Limonene and terpinolene-forward strains push toward uplifting, cerebral results. If you want to learn more about how individual terpenes shape the experience, our pinene terpene guide and humulene guide break down the science in grower-relevant terms.
Recommended Strains for Cannabutter
These strains represent strong starting points across different effect profiles. We include both widely-known varieties and options we carry — the goal is to give you the most useful information, not push any single product.
High-potency, broad appeal (dispensary-famous strains):
- Gorilla Glue #4 — 27–30% THC, resinous and easy to work with, relaxing body effect in edibles
- Wedding Cake — 25–27% THC, sweet terpene profile that pairs well with baked goods, balanced high
- Gelato — 20–25% THC, smooth and euphoric, adds dessert-forward terpene notes
- GSC (Girl Scout Cookies) — 22–25% THC, classic cookie-like flavor that works beautifully in butter-based recipes
High-potency strains available as seeds:
- Quantum Kush — 30% THC, one of the highest-testing strains available; use fewer grams per cup to control potency
- Purple Kush — 27% THC, dense resinous buds with a sedating body effect — ideal for nighttime edibles and sleep-focused batches; see our best strains for sleep guide
- OG Kush — 26% THC, classic earthy-fuel terpene profile, well-rounded effect that works for most use cases
- Black Widow — 26% THC, high resin production, excellent extraction efficiency
Medium-potency for mild/social edibles:
- White Widow — 25% THC, legendary resin production, balanced effect — see our social strains guide for more options
- Sour Diesel — 24% THC, uplifting and energizing, good for daytime edibles where you want to stay functional
- Super Lemon Haze — 23% THC, citrus terpene profile, energizing and creative — pairs well with lemon dessert recipes
- Zkittlez — 18–22% THC, fruity terpene-rich profile, relaxing without being overwhelming
Growing your own butter-destined plants? Use our yield estimator to plan how much flower you will realistically harvest per plant — this lets you calculate exactly how many batches of cannabutter you can make before you start growing.
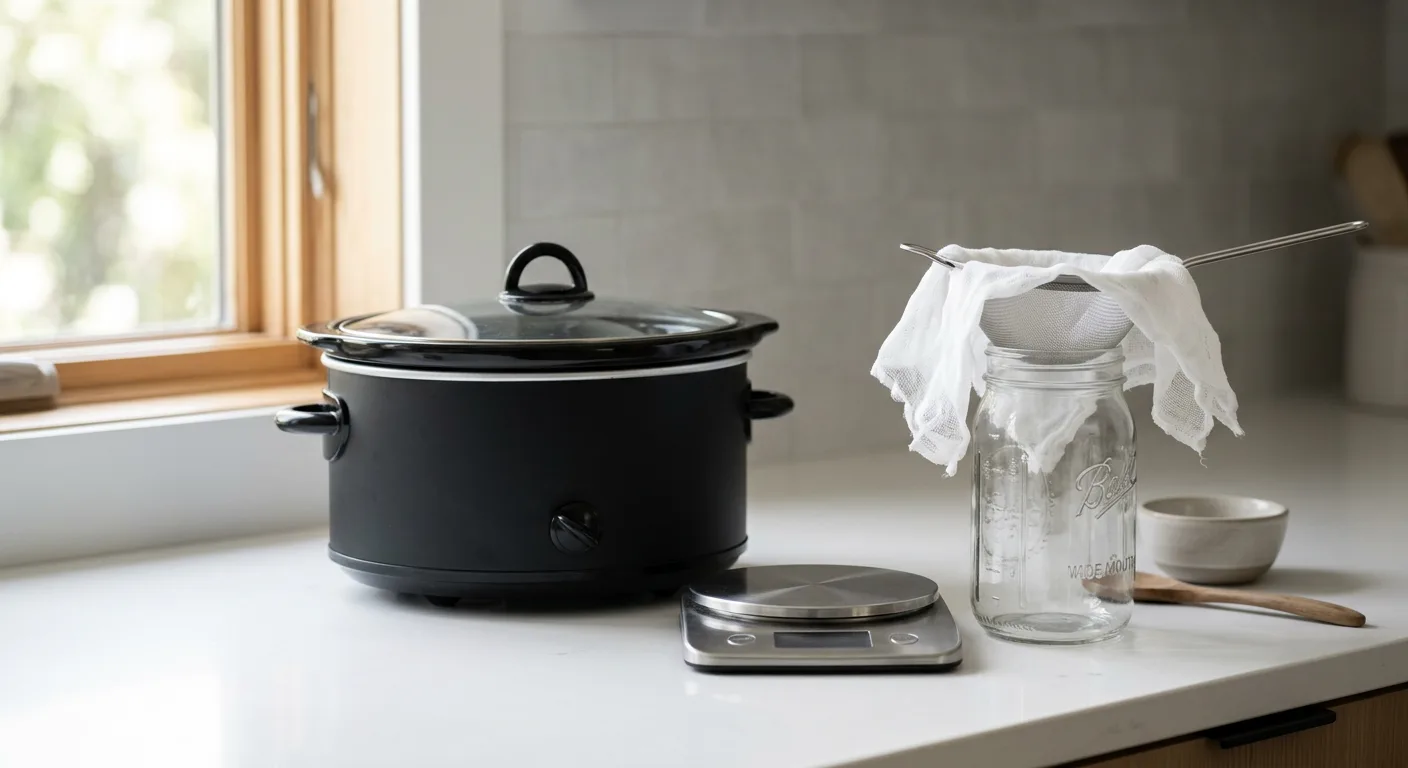
Step 3: Equipment You Actually Need (and Gadgets to Skip)
You need surprisingly little equipment to make excellent cannabutter. The three core methods — slow cooker, double boiler, and mason jar water bath — all produce comparable results when done correctly. Specialized gadgets offer convenience but rarely improve the final product.
The Essential Equipment List
- Kitchen scale (grams) — non-negotiable for accurate dosing
- Oven-safe baking sheet + parchment paper (decarb)
- Probe or oven thermometer
- Slow cooker OR double boiler setup
- Fine mesh strainer
- Cheesecloth (2–3 layers)
- Glass mason jars (quart size) for storage
- Rubber spatula
Method Comparison: Slow Cooker vs. Double Boiler vs. Mason Jar Water Bath
| Method | Smell Control | Temperature Control | Hands-On Time | Best For |
|---|---|---|---|---|
| Slow cooker (open) | Low | Good (low = 190–200°F) | Minimal | Most beginners |
| Double boiler (stovetop) | Medium | Moderate (requires monitoring) | High | Small batches, speed |
| Mason jar in water bath | High | Excellent (water caps at 212°F) | Medium | Odor reduction, precise temp |
| Sous vide bag | Very High | Excellent (set exact temp) | Minimal | Precision dosing, no mess |
Honest Review: The Magical Butter Machine
The Magical Butter Machine (around $175) automates the grind, heat, and stir cycle. It produces good cannabutter and requires almost zero supervision. The honest downsides: it requires a minimum of 2 cups of butter per batch (you cannot make a single-cup test batch), the machine itself retains significant butter in the mechanism after straining, and it is louder than a slow cooker. For growers making regular large batches, it earns its price. For someone making their first batch or experimenting with ratios, a $30 slow cooker does the job just as well.
The mason jar water bath method is the best choice if smell is your primary concern. Water physically cannot exceed 212°F at sea level, which means it is impossible to accidentally overheat and degrade your THC — a significant advantage over open stovetop methods.
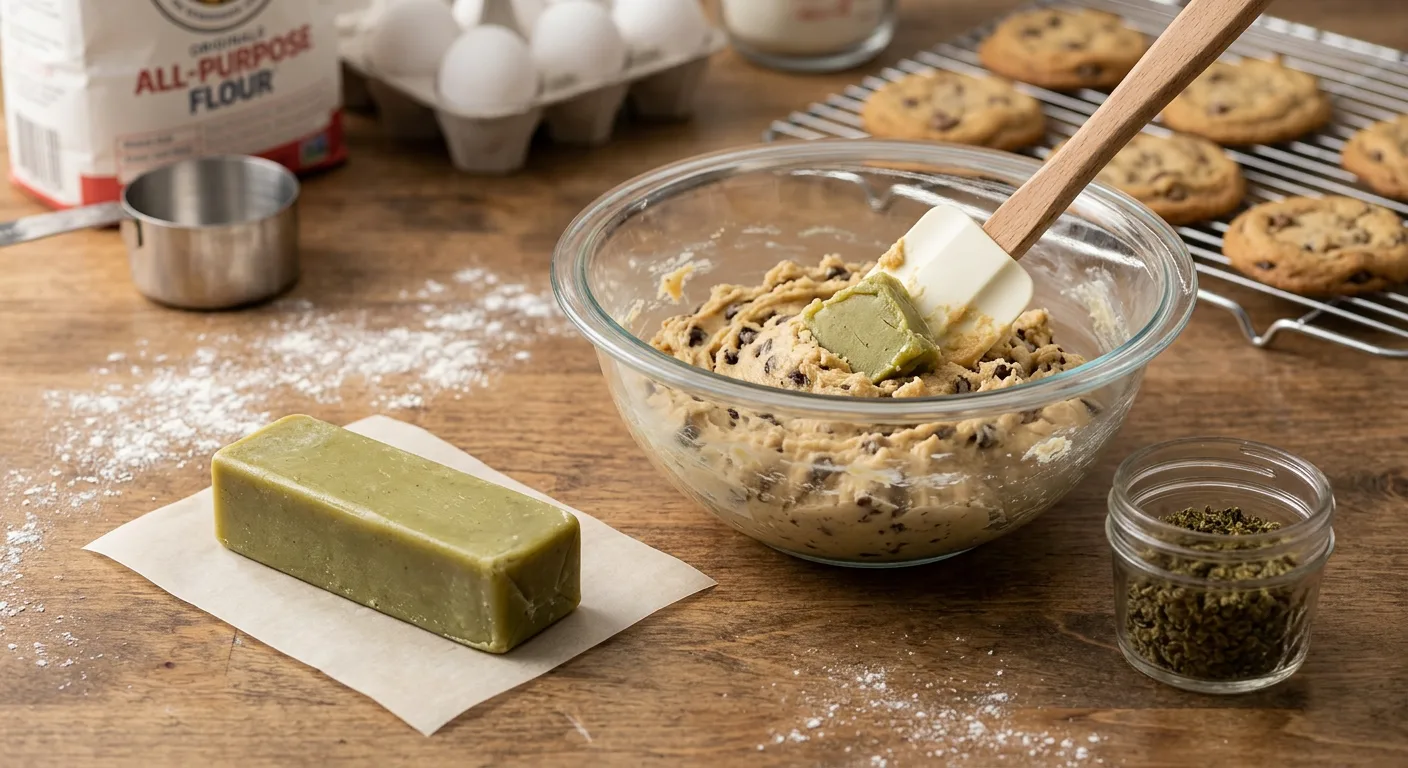
Step 4: The Cannabutter Recipe — Exact Ratios for Mild, Medium & Strong
The cannabutter recipe below uses 1 cup of unsalted butter as the base. Adjust ratios up or down using the same proportions. Use decarbed cannabis — meaning flower that has already been through the 240°F oven step in Step 1. Skipping decarb and adding raw cannabis directly to butter is the single most common mistake beginners make.
Cannabis-to-Butter Ratios by Strength
| Strength Level | Cannabis (decarbed) | Butter | Approx. mg THC per tbsp (at 20% THC strain) |
|---|---|---|---|
| Mild | 3.5g (⅛ oz) | 1 cup (2 sticks) | ~8–12mg |
| Medium | 7g (¼ oz) | 1 cup (2 sticks) | ~16–22mg |
| Strong | 14g (½ oz) | 1 cup (2 sticks) | ~32–44mg |
These milligram estimates are based on a 20% THC strain and a 75% extraction efficiency. Your actual numbers will vary. Always test a small amount of finished butter before incorporating it into a full recipe you plan to share with others.
Step-by-Step Cannabutter Instructions
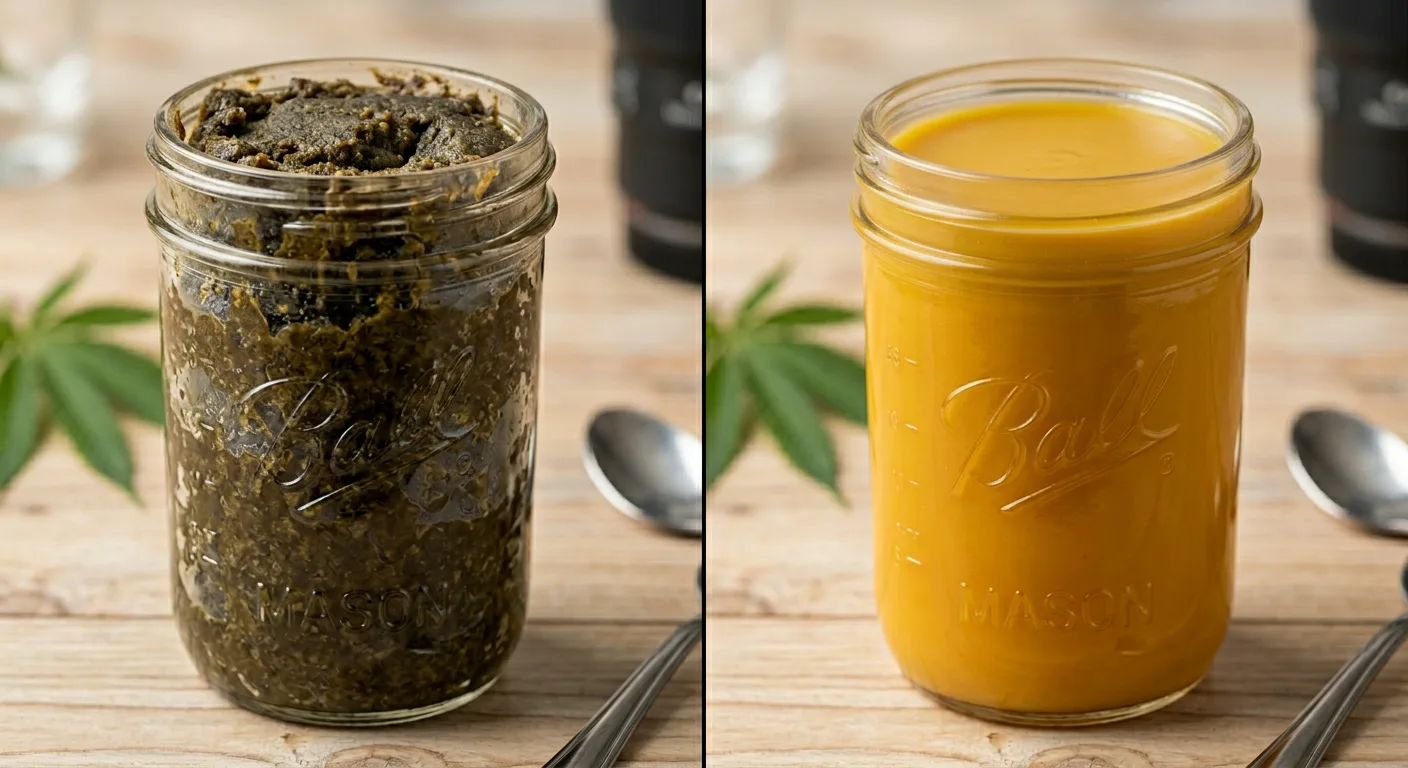
Decarb Your Cannabis
Preheat oven to 240°F. Break cannabis into small pieces and spread on a parchment-lined baking sheet. Bake for 40 minutes, then remove and cool completely. Do not skip this step.
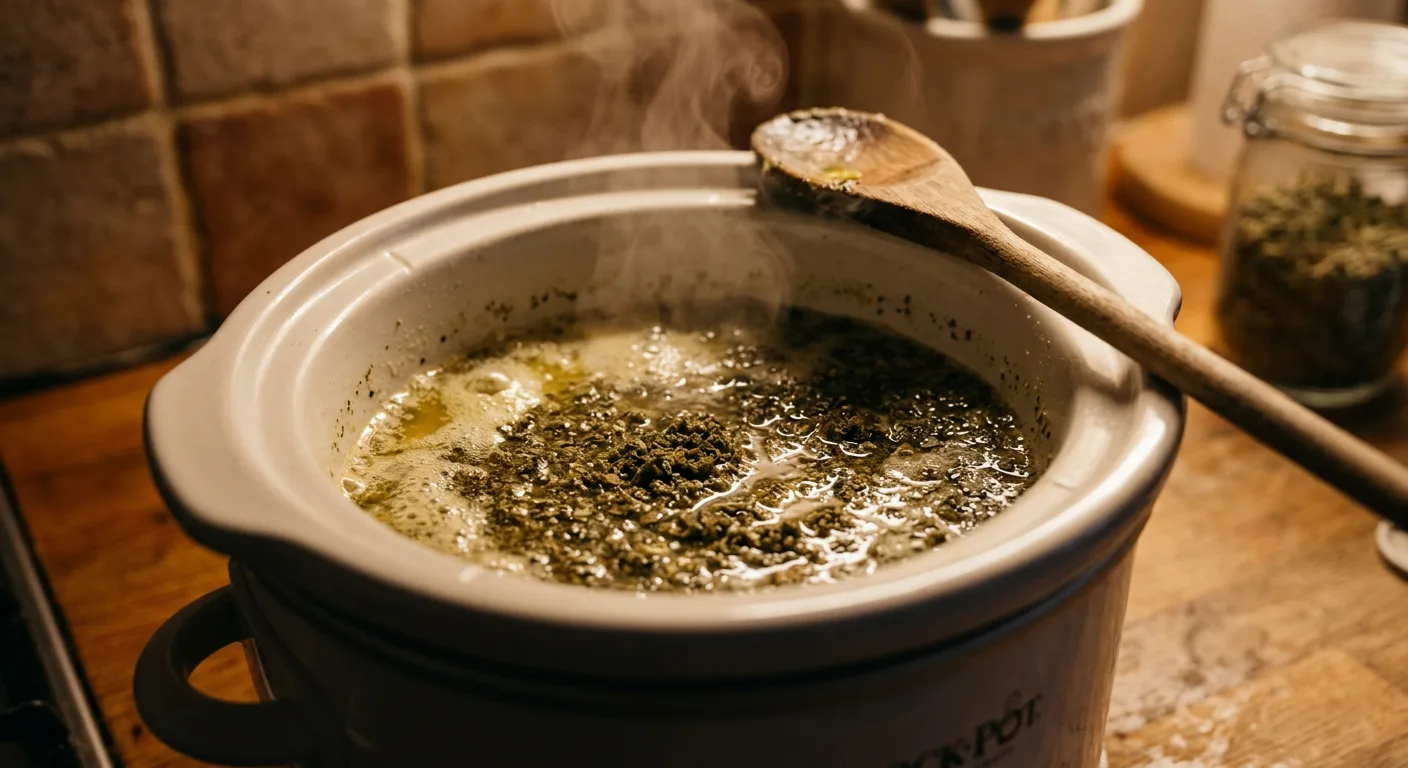
Melt the Butter
Add 1 cup of unsalted butter and 1 cup of water to your slow cooker. Set to low heat (ideally 160–190°F). The water prevents the butter from scorching and will be removed later — it is not optional.
Add Decarbed Cannabis
Once butter is melted, add your measured decarbed cannabis. Stir to combine. Do not add raw, undecarbed flower at this stage expecting the infusion heat to do the decarbing — it will not reach high enough temperatures.
Infuse for 3–4 Hours
Keep the slow cooker on low with the lid on. Stir every 30–45 minutes. Maintain temperature between 160–190°F — do not let it reach a rolling boil. A probe thermometer clipped to the side helps monitor this consistently.
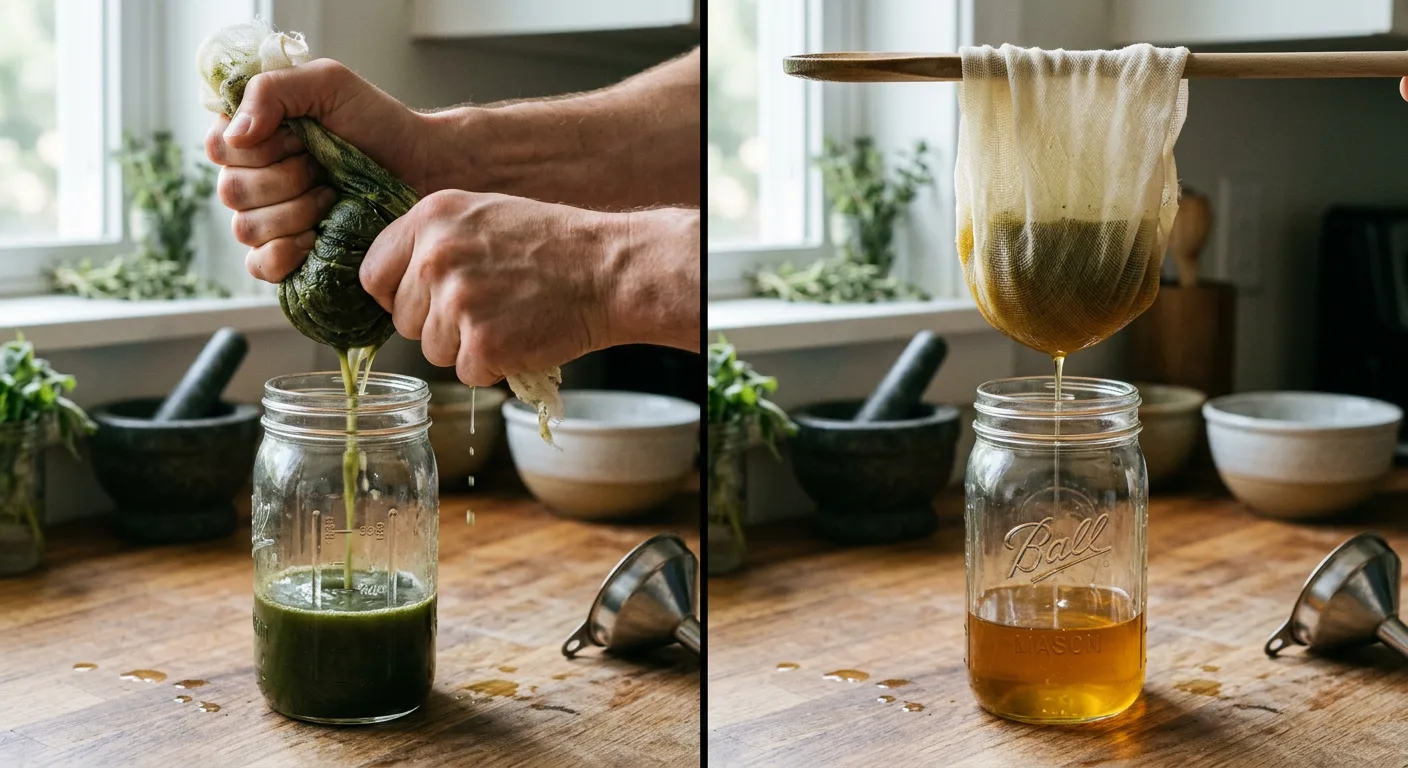
Strain Through Cheesecloth
Line a fine mesh strainer with 2–3 layers of cheesecloth and set it over a large bowl or mason jar. Pour the mixture through slowly. Let gravity do the work — do not squeeze the cheesecloth aggressively, as this forces chlorophyll and plant matter into the butter, making it taste harsh and green.
Refrigerate and Separate
Place the strained liquid in the refrigerator for 4+ hours (overnight is better). The butter will solidify on top of the water layer. Once fully solid, run a knife around the edges, lift the butter disc out, and discard the water beneath. Pat the bottom of the butter disc dry with a paper towel.
Test Your Potency
Before baking or cooking with the full batch, spread ¼ teaspoon (~1.25ml) on a piece of toast and wait 90 minutes to evaluate effects. This low-dose test tells you approximately where your butter lands on the strength scale before you commit it to a 24-piece batch of brownies.
Adding 1 cup of water during infusion is not optional — it is a critical technique. Water absorbs water-soluble impurities (chlorophyll, plant acids) that would otherwise make your butter taste harsh and dark green. It separates cleanly in the fridge. Every professional edibles recipe uses this technique.
Step 5: Calculating Potency — The Grower's Formula
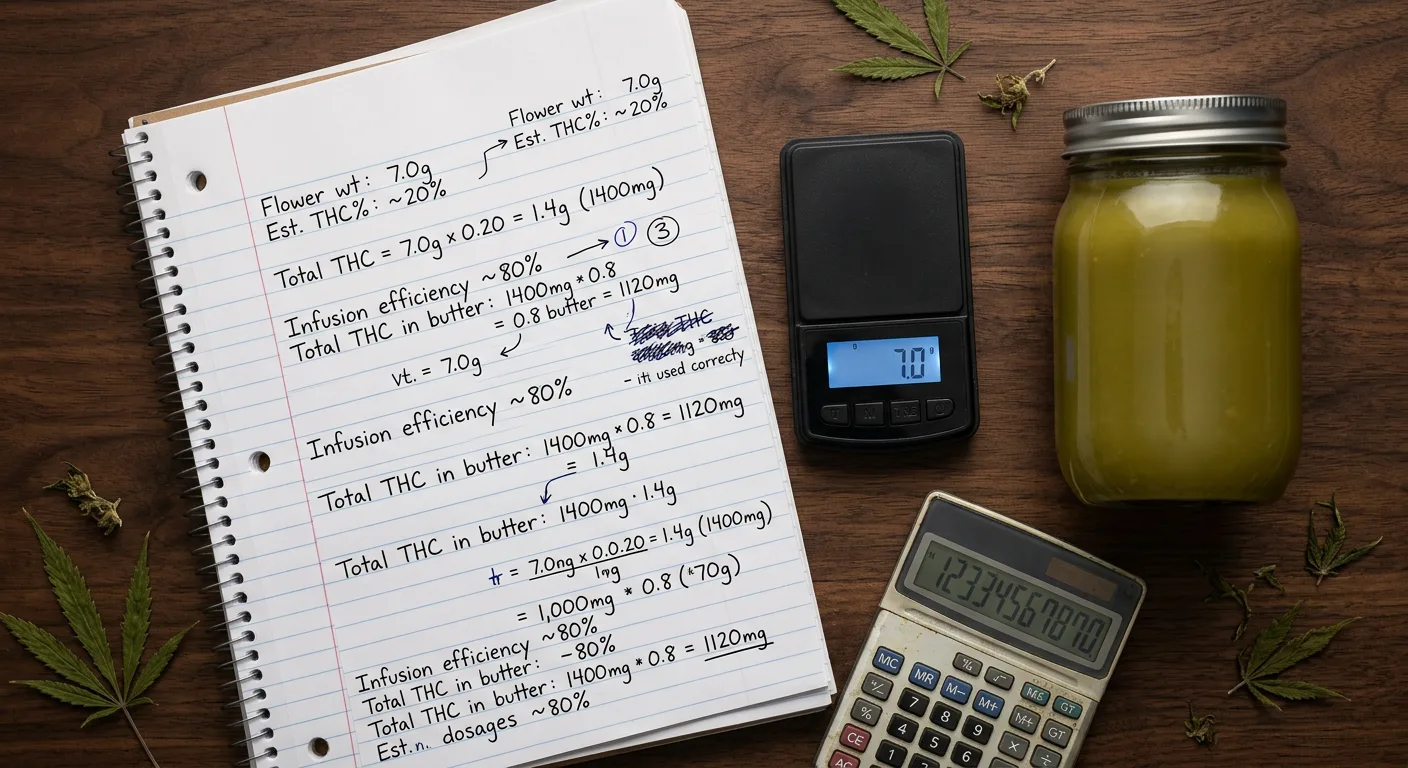
Most edibles articles assume you bought dispensary-tested cannabis and just need to divide by servings. If you grew your own, you have something better: a confirmed THC percentage from either a lab test or a trusted seed breeder's data. This formula uses that number to estimate milligrams of THC per tablespoon of finished butter.
The Potency Calculation Formula
Here is the formula every home grower should know:
Estimated THC per batch (mg) = THC% × Weight of cannabis (g) × 10 × Absorption factor (0.75)
Breaking that down:
- THC% — your strain's tested or listed THC percentage as a decimal (e.g., 25% = 0.25)
- Weight (g) — grams of decarbed cannabis used
- × 10 — converts the result to milligrams (1g = 1,000mg, 1% of 1g = 10mg)
- × 0.75 — accounts for realistic extraction efficiency (roughly 75% of available THC transfers to butter; the rest stays in plant matter or degrades)
Worked Example: OG Kush at 26% THC
You are using 7 grams of OG Kush (26% THC) infused into 1 cup of butter:
- 0.26 × 7 × 10 × 0.75 = 136.5mg total THC in the entire cup of butter
- 1 cup of butter = 16 tablespoons
- 136.5mg ÷ 16 = ~8.5mg THC per tablespoon
- A recipe using 4 tablespoons across 24 brownies = ~1.4mg per brownie (very mild)
- A recipe using 8 tablespoons across 12 cookies = ~5.7mg per cookie (standard beginner dose)
Adjusting for High-THC Strains
Now run the same math with 7g of Quantum Kush at 30% THC:
- 0.30 × 7 × 10 × 0.75 = 157.5mg total THC
- 157.5mg ÷ 16 = ~9.8mg per tablespoon
That is a 15% increase in potency just from the strain choice at the same gram ratio. For very high-THC strains like Quantum Kush or Purple Kush (27%), reduce your gram-per-cup input by 20–25% to keep servings in a predictable range.
The 0.75 absorption factor is a conservative estimate. Some growers using optimized methods (fine grind, sous vide at precise temps, longer infusion) may achieve 80–85% efficiency. Some open-pot methods run closer to 65%. Until you have dialed in your specific setup, 0.75 is the right number to use for safety.
Use our edible dosage calculator to run these numbers automatically with your specific strain and batch size — it also outputs per-serving estimates for different recipe formats.
Step 6: Common Cannabutter Mistakes and How to Fix Them
Most failed cannabutter batches trace back to a handful of consistent errors. Here is a diagnostic breakdown of what goes wrong, what it looks like, and how to correct it — including problems competitors rarely address honestly.
Mistake 1: Skipping Decarboxylation
What it looks like: Butter is bright green and fragrant. Edibles smell strongly of cannabis. Effects are minimal or absent even after eating large amounts.
Why it happens: The infusion temperature in a slow cooker (160–190°F) is not high enough to fully decarboxylate THCA. Many beginners assume the heat during infusion completes the conversion. It does not — it is too low for efficient decarb and too short even if it were the right temperature.
Fix: Always decarb first in the oven at 240°F for 40 minutes before adding cannabis to butter.
Mistake 2: Infusing at Too High a Temperature
What it looks like: Butter turns very dark green or brown, smells burnt or plant-like, produces harsh-tasting edibles with inconsistent effects.
Why it happens: Using stovetop heat without water, or setting a slow cooker to high, pushes temperatures above 200°F consistently. At these temps, terpenes degrade rapidly and THC begins converting to CBN.
Fix: Add 1 cup of water to the infusion. Water physically limits the maximum temperature to 212°F at sea level, and the actual infusion stays closer to 175–185°F. A probe thermometer confirms the real temperature.
Mistake 3: Squeezing the Cheesecloth
What it looks like: Butter is very dark, tastes strongly bitter and vegetal, has a rough aftertaste in baked goods.
Why it happens: Squeezing the cheesecloth to get every last drop forces chlorophyll, plant waxes, and bitter compounds into the butter. Gravity filtration leaves these behind.
Fix: Let the cheesecloth drain under its own weight for at least 30 minutes. Accept that you will leave some butter behind — it stays in the plant material. The finished product quality is worth the small yield loss.
Mistake 4: Not Washing With Water
What it looks like: Butter tastes more plant-like than expected, color is darker than competitors' photos, edibles have a noticeable cannabis flavor that overwhelms the recipe.
Why it happens: Skipping the cup of water during infusion means all the water-soluble plant compounds (chlorophyll, plant acids, tannins) have nowhere to go except into your butter.
Fix: Always infuse with an equal volume of water. It separates cleanly in the fridge and takes the impurities with it.
Mistake 5: Over-Filtering (Losing Potency)
What it looks like: Butter is very clear and pale yellow, effects are much milder than expected given the input gram weight.
Why it happens: Using coffee filters instead of cheesecloth, or running the butter through multiple fine-filter passes, strips out cannabinoid-rich material along with the plant matter. Coffee filters are too fine and actively reduce potency.
Fix: Use 2–3 layers of cheesecloth. That is the correct filtration level. Do not use coffee filters, paper towels, or ultra-fine mesh strainers.
Mistake 6: Inconsistent Butter Distribution in Recipes
What it looks like: Some brownies hit hard, others seem weak from the same batch.
Why it happens: The cannabutter was not stirred thoroughly before measuring into a recipe, or the recipe itself does not distribute butter evenly (e.g., layered dishes).
Fix: Before using cannabutter in a recipe, let it soften to room temperature and stir it vigorously. For baking, blend it thoroughly into the recipe batter before portioning into individual pieces.
Never dose edibles based on how they taste. Cannabis flavor in finished food is not a reliable indicator of potency — well-made cannabutter tastes quite mild. Dose by calculation, test with a small amount, and wait a full 90 minutes before deciding you need more.
Step 7: Storage, Shelf Life & Knowing When It's Gone Bad
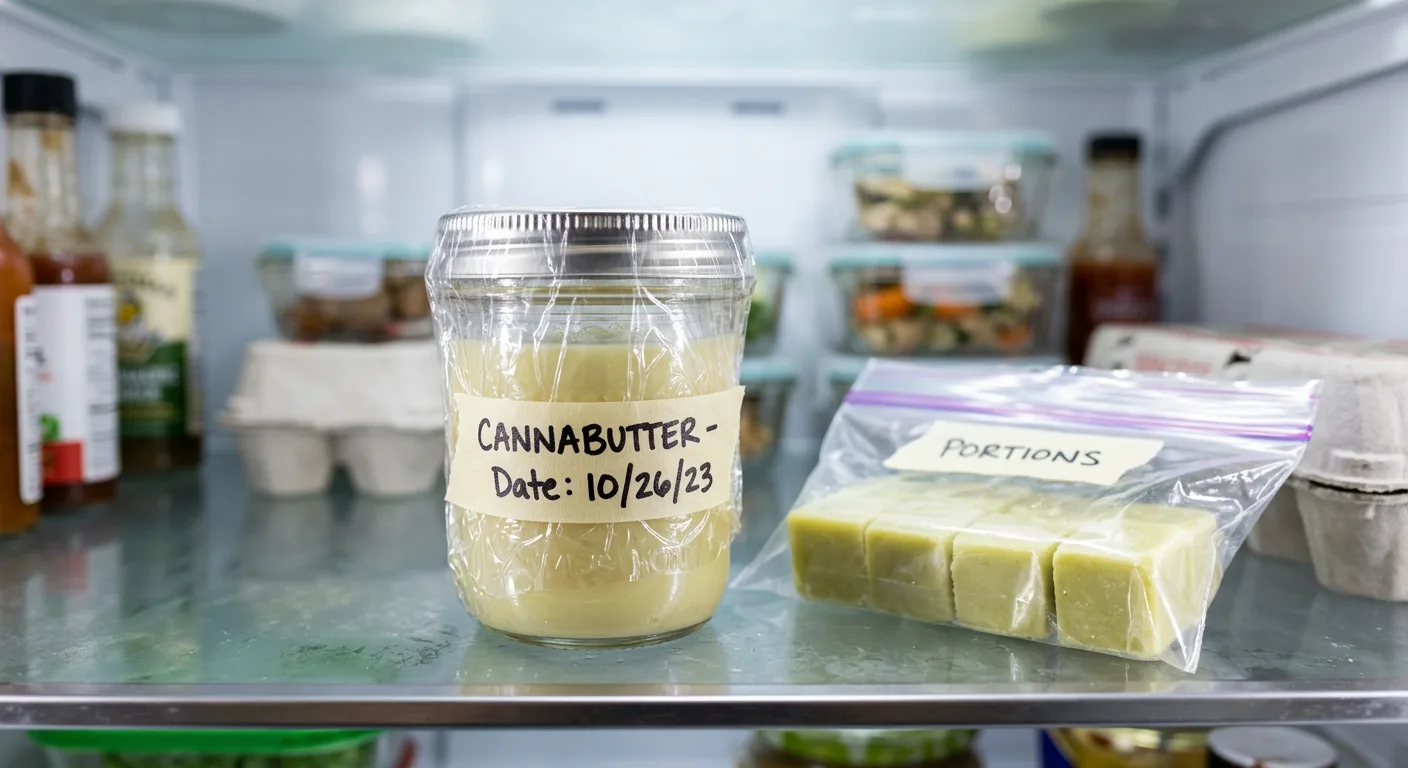
Cannabutter stores the same way as regular butter — it is a fat-based product and is subject to the same oxidation and microbial growth. The cannabis component does not extend its shelf life. Proper storage is critical both for food safety and for preserving THC potency over time.
Storage Options and Shelf Life
| Storage Method | Container | Shelf Life | THC Preservation |
|---|---|---|---|
| Room temperature | Any | 1–2 days | Degrades quickly |
| Refrigerator | Sealed glass jar or wrapped block | 2–4 weeks | Good |
| Freezer | Vacuum-sealed or double-wrapped | 4–6 months | Excellent |
For long-term storage, portion the butter into tablespoon-sized blocks using an ice cube tray before freezing. Each cube = a pre-measured dose you can pull out individually. Label each container with the date made, the strain used, and the gram-per-cup ratio so you can replicate results or adjust next time.
For more on preserving terpenes and cannabinoids in stored cannabis products, our long-term cannabis storage guide covers the science behind degradation rates.
How to Tell If Cannabutter Has Gone Bad
- Mold: Fuzzy white, blue, or green spots on the surface — discard immediately
- Rancid smell: Sour, stale, or cheesy odor that is distinct from the normal earthy-cannabis smell
- Slimy texture: Surface feels slick or wet rather than smooth and waxy
- Color change: Yellow-to-gray or greenish-gray discoloration (not the normal light green from cannabis)
Airtight glass containers outperform plastic wrap for cannabutter storage. Cannabis compounds can partially leach into plastic over time, and glass provides a better oxygen barrier. Wide-mouth mason jars work perfectly and are easy to label with masking tape and a marker.
Dosing Table: How Strong to Make Your Cannabutter by Use Case

Not every application needs the same potency. Topicals require different cannabinoid concentrations than baked goods. Social situations call for lower doses than personal therapeutic use. Use this table to match your batch strength to your intended purpose before you start.
| Use Case | Target mg THC per serving | Recommended Ratio | Notes |
|---|---|---|---|
| First-time/beginner edibles | 2.5–5mg | Mild (3.5g/cup) | Wait 90 min before redosing |
| Social event baking | 5–10mg | Mild-Medium (5–7g/cup) | Label clearly; offer non-infused options |
| Standard recreational use | 10–15mg | Medium (7g/cup) | Standard for experienced users |
| High-tolerance use | 20–30mg | Strong (10–14g/cup) | Not for beginners |
| Sleep / relaxation edibles | 10–20mg | Medium-Strong, indica-dominant strain | Pair with high-myrcene strains; see relaxation strains |
| Topical application | N/A (no psychoactive effect) | Strong (14g/cup) | High concentration needed for skin absorption |
| Savory cooking (pasta, sauces) | 5–10mg per serving | Mild-Medium | Heat degrades some THC — use at end of cooking |
When cooking cannabutter into hot dishes (soups, sauces, sautéed vegetables), add it at the very end of cooking, off direct heat. Sustained exposure to temperatures above 300°F will degrade THC. Baking is different — the interior of baked goods rarely exceeds 210°F, so THC survives well in cookies and brownies.
Dosing by Body Weight and Tolerance
Body weight is one factor in edible response, but tolerance and metabolism matter more. The most honest framework for new users is the rule of halves: start with 5mg, wait 90 minutes, and take another 5mg only if you feel nothing. Build from there over multiple sessions before increasing your standard dose. Never re-dose at the 45-minute mark because you do not feel it yet — the peak for most people comes 60 to 120 minutes after consumption.
Adjusting Recipes for Your Butter's Potency
Once you know your butter's potency per tablespoon (using the formula in Step 5), you can reverse-engineer any recipe. Take the total tablespoons of cannabutter the recipe calls for, multiply by your mg-per-tablespoon figure, then divide by the number of servings. If the per-serving number is too high, dilute your cannabutter with equal parts regular unsalted butter until you hit your target dose.
Dilution with regular butter is the fastest and most reliable way to adjust potency down after making a strong batch. Measure and store diluted butter separately so you always know exactly what concentration you are working with.
Smell Reduction: How to Make Weed Butter Without Smell
Reducing odor during the cannabutter process requires managing both the decarb and the infusion stages separately. Each produces distinct smells from different compounds, and each needs its own approach.
Decarb Smell Control
- Use the sealed mason jar method (described in Step 1) — most effective technique
- Run your kitchen exhaust fan on maximum
- Decarb during daytime when windows can be opened
- A carbon filter placed near the oven vent captures additional terpene vapor
Infusion Smell Control
- Use the mason jar-in-water-bath method: place sealed cannabis-and-butter jar in a pot of water on the stove at 185°F for 4 hours
- Sous vide bags sealed under vacuum produce almost zero airborne smell
- Avoid slow cookers without lids — they release continuous vapor into the room
- Keep infusion temperature as low as possible while still being effective (160–185°F)
Where to Go From Here: Edibles That Use Cannabutter
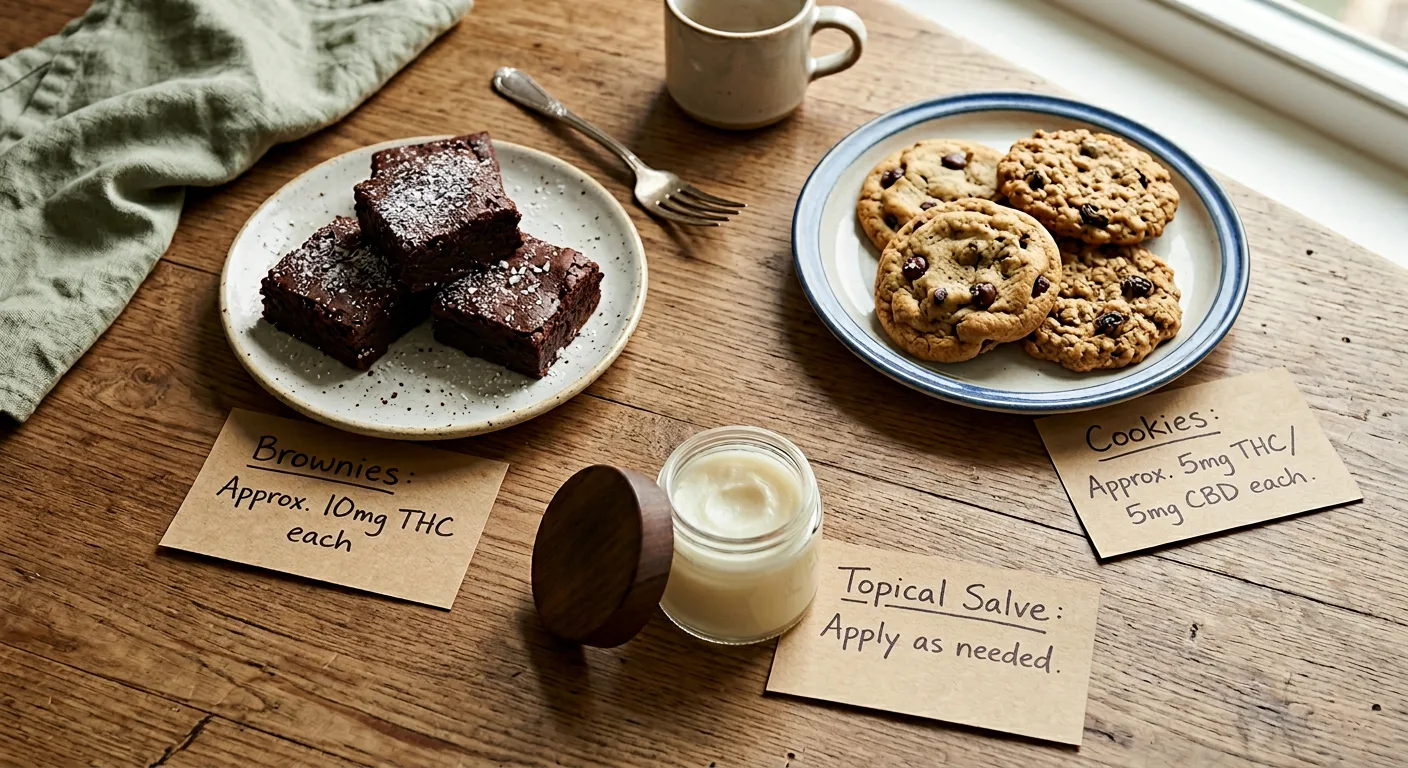
Cannabutter is the foundation skill because every fat-based cannabis recipe builds on it. Once you have a consistent, potency-calculated batch of butter in the fridge, the recipe options are essentially unlimited. Classic cannabutter applications include:
- Baked goods: Brownies, cookies, banana bread, muffins — the most forgiving format for beginners
- Breakfast: Pancakes, waffles, French toast — lower-temp cooking preserves THC well
- Savory dishes: Garlic bread, risotto finish, compound butter for steak — use at end of cooking only
- Frosting and glaze: Buttercream frosting for cakes, drizzle glazes — no heat required, full THC retention
- Cannabis topicals: Infused salves and body butters using high-concentration batches
If you are planning your grow specifically around edibles production, our grow planner helps you map out plant count, harvest timing, and flower quantity so you know exactly how much butter you can produce from each harvest cycle.
For growers focused on maximizing the resin content of their harvest — which directly impacts your butter's potency ceiling — our ScrOG growing guide covers how to maximize bud site exposure and overall yield quality. And for post-harvest preparation, proper curing directly affects the terpene profile of your starting material: our small harvest curing guide covers the full process for typical home-grow quantities.
If you are growing your own plants for edibles, harvest timing matters as much as strain selection. Harvesting at peak trichome maturity (mostly cloudy trichomes with 10–20% amber) produces butter with a balanced THC-to-CBN ratio and optimal terpene presence. See our complete harvest timing guide for detailed trichome reading instructions.
Frequently Asked Questions
How long does cannabutter take to make?
The full process runs 3.5 to 5 hours. Decarboxylation takes 40 minutes at 240°F. Infusion in a slow cooker takes 3 to 4 hours on low. After straining, refrigerate overnight for the butter to fully separate from the water layer before use.
How much weed do I need for cannabutter?
A standard medium-strength batch uses 7 grams (quarter ounce) of decarbed cannabis per cup of butter. Mild batches use 3.5 grams per cup. Strong batches use 10–14 grams per cup. If you know your strain's THC percentage, use the potency formula in Step 5 to calculate exact milligrams per serving before you start cooking.
Why is my cannabutter not working?
The most common cause is skipping or under-doing decarboxylation. If THCA does not convert to THC before infusion, your butter will have almost no psychoactive effect regardless of how much cannabis you used. The second most common cause is infusing at too high a temperature, which degrades THC into CBN. Use a thermometer to confirm you are staying in the 160–190°F range during infusion.
Can I use trim, shake, or sugar leaves instead of buds for cannabutter?
Yes — trim, shake, and sugar leaves all contain THC and work well for cannabutter. They typically test at 30–60% of the bud's THC percentage depending on how much trichome coverage they carry. Increase your gram-per-cup ratio proportionally. A rough starting point: use 1.5 to 2 times the gram quantity of trim compared to buds for a similar potency result. Decarb time and method remain identical.
Does the type of butter matter — salted vs. unsalted?
Use unsalted butter. Salted butter works in a pinch, but salt accelerates oxidation and can interfere with the flavor profile in delicate baked goods. More importantly, unsalted butter has a slightly higher fat content by percentage, which marginally improves THC extraction. Clarified butter (ghee) is another excellent option — it is pure fat with no water content, which can improve extraction efficiency and shelf life.